We’ve Come a Long Way

It’s been a while since I published to my blog. For the last 6+ years I’ve been heads down helping to build the company I’ve always wanted to work for.

I started as a Jr developer. Fresh off the heels of quitting my job at a Fortune 500 company and attending Omaha Code School. It was a restart on my admittedly young career.

We were a small team. If I remember right, there were 10 of us when I joined. 3 co-founders, 1 developer, 3 in support, 2 in marketing, and me. Although we dreamed that our little company would turn into a successful business, none of us were sure at that point.

Flash forward 6 years and we’d moved into a new building, expanded to 3 floors, taken on a 2nd and a 3rd location (all on the same block!). We’d grown from 10 to 250. Customer numbers were up. We’d done it! Not only had we done it, but we did it in Omaha, Nebraska. Flyover country. It’s safe to say that we were proud of how far we’d come.

At the same time, I was growing right along side. First in my skills as a Ruby on Rails engineer, but then concentrating on support tooling and automation. I wen’t from being the Jr dev, to the team lead. From taking orders to giving them. In the moment, change was a constant force driving us to learn and grow.

My family was also growing. We had 2 kids and were growing as parents at the same time as balancing our careers.

In 2019 we caught the attention of another company in our industry, and they made an offer to acquire us. We’d come full circle. We’d achieved our goals. We had lived the dream.

But that’s not the end of the story. We’re still here. Working to build the best product we can. We’re evolving our vision and finding a new home within a new organization. I’m still growing my skills and working on my career. Meeting new people. Working on new teams. A lot is new, but a lot doesn’t change.

So why am I writing now? Is my story here done? No. I’m not done here yet. I have new goals, new things to learn, and new skills to work on.

As of this week, I’ve taken a large leap into the unknown. It wasn’t something that I planned on doing, but it’s where this journey has led me, and who am I to stop now. I’ve moved from being an engineer to being a manager.

A lot has been written about the struggles of making this type of change. I would say that I was always a strong engineer. A lot of times this type of move doesn’t work. (And honestly I don’t know if it will yet) I’ve set a goal for myself to blog about my journey. This is why this post exists.

I don’t plan on speaking about specific decisions or situations. I don’t think that’s fair to my employer or my team. I want to highlight things that I didn’t realize were happening from my view as an engineer. Things that were “behind the curtain” in a way.

I want to write about things that force me to learn and get better.

I want to write about different approaches to management as I learn about them.

I want to have a mechanism that forces me to be intentional about my new role.

And, I just want to.

If this is a journey that you’d like to hear about, I’d appreciate words of encouragement. If I luck into writing something meaningful, share it with someone. I’m not the best at writing, but this is something else I’m trying to get better at.

Wish me luck!

Andy
Customize Terminal Colors by Directory Using iTerm2

A lot of users responded to my VS Code color customization post with requests to do something similar in their terminal. Luckily, if you’re a Mac user, there is an option that’s easy to configure and works really well.

Instead of using the built-in Terminal application, I use iTerm2. It builds upon the standard terminal and adds a lot of really nice features like split panes, profiles, triggers and more!

For this post, we’ll be focusing on one of my favorite features, profiles.

Profiles allow you to change the behavior of the terminal window by simply switching the profile you are using. Modifications can include colors, fonts, window size, key mappings, etc.

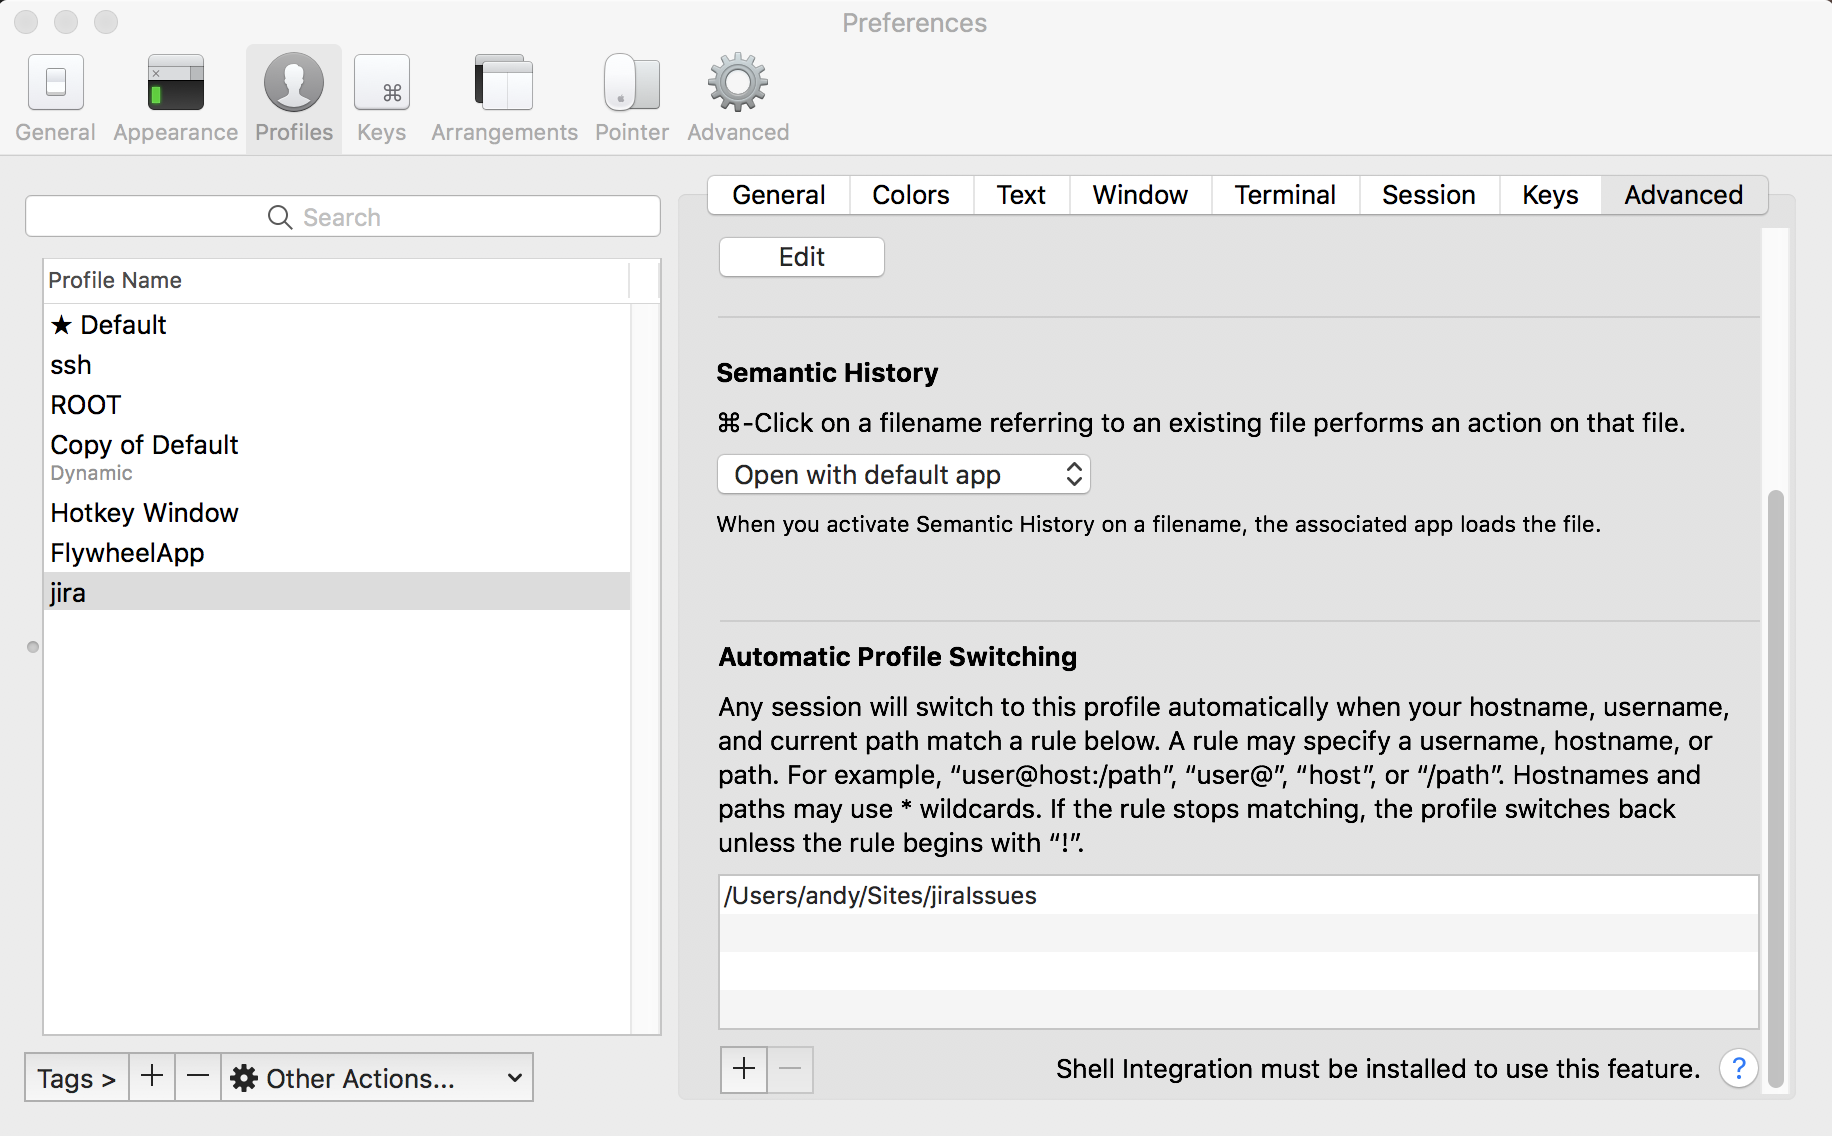
There’s a hidden option on profiles that’s buried in the Advanced tab called Automatic Profile Switching. The writeup is understandably complex if you look at the documentation. iTerm2 can use information it knows about your current path, host name, and user name to change profiles.

This is exactly what we need to configure the auto switching behavior we are looking for. By cloning your default profile, you can customize the colors however you’d like. Then, using the Automatic Profile Switching, configure iTerm to automatically use the profile when you enter the directory.

Here’s an example of how I have mine setup.
iTerm2 Profile Advanced Tab

With this setup. Anytime I enter the /Users/andy/Sites/jiraIssues directory, iTerm2 will automatically switch the profile to use jira. You can see this in action in the quick gif below.

As you can see, as soon as I enter the directory the colors change and the jira profile is in effect. When i change back to my home directory, the default profile takes over again.

This method can be used to visually identify when you enter a directory in your terminal session.

Hopefully you found this helpful. Leave a comment below if there’s something I missed.

Git Ignore VS Code Workspace settings

When you add a lot of workspace or project specific VS Code settings files, Git likes to try and track those files. This is okay if you are working on your own project, but less than ideal if you are working on an open source project, or on a team.

This post will talk about options you can add to globally ignore VS Code settings files from all of you Git projects.

Configure an excludesfile in your .gitconfig file.

On Mac, you should be able to fine a .gitconfig file in your user’s home directory. You can edit the file to add the following. The path found here will define the file location to a global ignore file.

[core]
  excludesfile = /Users/andy/.gitignore_global

Add VSCode settings files to the global ignore file

Once you have Git configured to look for a global exclude file, you can add the .vscode/ directory to the file. This is the pathing that VS Code uses when storing workspace specific settings.

.vscode/

And that’s it! You won’t have Git constantly tracking your .vscode directory anymore.

Feel free to comment below if I’ve left anything out of or if you have anything questions.

Workspace Specific colors in VS Code

So today I sent out an innocent little tweet. (That happened to get retweeted by the official VS Code account)

I’ve had lots of responses asking how I did it. So I whipped up this quick post to walk you through to process.

TLDR: There isn’t a one-click option to do this.

TLDRv2: Apparently the Peacock extension is capable of something similar. Try it out and let me know how it goes!

Since VS Code is based on Electron/Chromium, you have access to a whole level of customizations that you would never have. Combine this with VS Code’s ability to have workspace specific settings files and you have all you need to setup your environment.

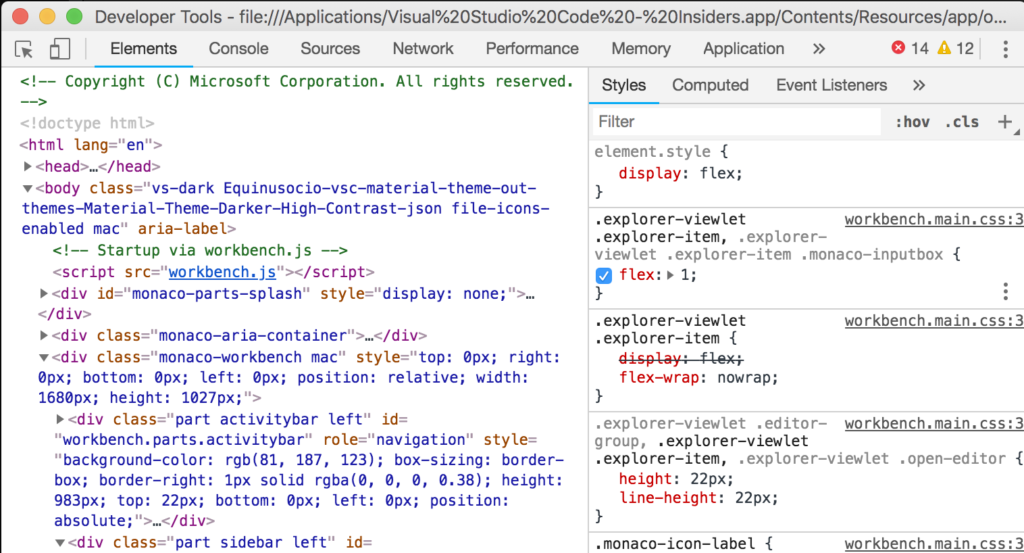
By opening Developer Tools, ⌘ + ⌥ + I or by selecting from the help menu, you get access to Chrome-like set of tools that you can use to inspect the editor.

As you can see, you can customize things via a CSS-like syntax and see changes in the editor in real time. The problem being that it doesn’t persist.

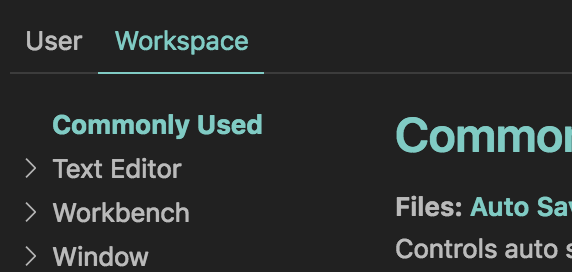
Enter project specific settings files. By opening your settings, ⌘ + ,, you can select the Workspace tab to customize things specific to the workspace you are in.

From there, I choose to update my settings in JSON mode. It’s easier for me when customizing the appearance settings like color.

In a section for "workbench.colorCustomizations", you can add any customizations you want. I pulled the one’s I wanted by using the inspector to find the elements I wanted to customize.

{
	"workbench.colorCustomizations": {
		"activityBar.background": "#8351a0",
        "statusBar.background": "#5e3a74",
        "statusBar.foreground": "#b3b3b3",
        "scrollbarSlider.activeBackground": "#8351a0",
        "editorSuggestWidget.highlightForeground": "#b3b3b3",
        "titleBar.inactiveBackground": "#5e3a74",
		"titleBar.activeBackground": "#8351a0",
        "progressBar.background": "#8351a0",
        "pickerGroup.foreground": "#8351a0",
		"tab.activeBorder": "#8351a0",
		"list.highlightForeground": "#8351a0",
	}
}

From there, I picked 2 complementary colors for each project, one slightly lighter than the other. In this case #5e3a74 and #8351a0.

By customizing these settings, the appearance of my VS Code window changes based on the workspace that is open. By setting this up in my main workspaces, it makes them much easier to find when I have multiple workspaces open.

Hopefully that helps! Feel free to reply to my tweet, or leave a comment below if you have any additional questions.

Tip: How to add workspace specific settings to a global Git ignore file

Colors:
Purple: #5e3a74 #8351a0
Green: #2c6442 #51bb7b
Orange: #bb5f23 #fab889

Debug a Ruby on Rails server using VS Code

One of the drawbacks to using Ruby or Ruby on Rails in the inability to debug your code from within an integrated development environment, or IDE. For someone that is used to debugging in this way, Ruby feels like a large step back in their productivity.

My personal IDE of choice is VS Code. It’s a free IDE that was spun off of the Microsoft Visual Studio suite of tools and has really become one of the best free IDEs available today. Like many IDEs, VS Code has the ability to extend it’s core functionality using a catalog of extensions. I recently came across an extension that mentioned being able to use VS Code’s debugger with Ruby, so I dug in to figure it out.

Read more